| This article needs additional citations for verification. Please help improve this article by adding citations to reliable sources. Unsourced material may be challenged and removed. Find sources: "Coordinate-measuring machine" – news · newspapers · books · scholar · JSTOR (September 2009) (Learn how and when to remove this message) |
A coordinate-measuring machine (CMM) is a device that measures the geometry of physical objects by sensing discrete points on the surface of the object with a probe. Various types of probes are used in CMMs, the most common being mechanical and laser sensors, though optical and white light sensors do exist. Depending on the machine, the probe position may be manually controlled by an operator, or it may be computer controlled. CMMs (coordinate-measuring machine) specify a probe's position in terms of its displacement from a reference position in a three-dimensional Cartesian coordinate system (i.e., with XYZ axes). In addition to moving the probe along the X, Y, and Z axes, many machines also allow the probe angle to be controlled to allow measurement of surfaces that would otherwise be unreachable.


Description
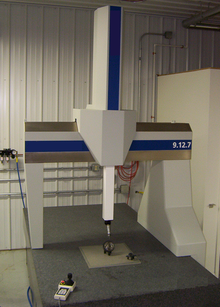
The typical 3D "bridge" CMM allows probe movement along three axes, X, Y, and Z, which are orthogonal to each other in a three-dimensional Cartesian coordinate system. Each axis has a sensor that monitors the position of the probe on that axis, with typical accuracy in the order of microns. When the probe contacts (or otherwise detects) a particular location on the object, the machine samples the axis position sensors, thus measuring the location of one point on the object's surface, as well as the 3-dimensional vector of the measurement taken. This process is repeated as necessary, moving the probe each time, to produce a "point cloud" which describes the surface areas of interest. The points can be measured either manually by an operator, automatically via Direct Computer Control (DCC), or automatically using scripted programs; thus, an automated CMM is a specialized form of industrial robot.
A common use of CMMs is in manufacturing and assembly processes to test a part or assembly against the design intent. The measured points can be used to verify the distance between features. They can also be used to construct geometric features such as cylinders and planes for GD&T so that aspects like roundness, flatness, and perpendicularity can be assessed.
Technical facts
Parts
Coordinate-measuring machines include three main components:
- The main structure includes three axes of motion. The material used to construct the moving frame has varied over the years. Granite and steel were used in the early CMMs. Today all the major CMM manufacturers build frames from materials like granite, aluminum alloy or some derivative, and ceramic to increase the stiffness of the Z axis for scanning applications. Few CMM builders today still manufacture granite-frame CMMs due to market requirements for improved metrology dynamics and increasing trends to install CMMs outside of the quality lab. The increasing trend towards scanning also requires the CMM's Z axis to be stiffer, and new materials have been introduced such as black granite, ceramic, and silicon carbide.
- A probing system.
- A data collection and reduction system — this typically includes a machine controller, desktop computer, and application software.
Availability
These machines are available as stationary or portable.
Accuracy
The accuracy of coordinate measurement machines is typically given as an uncertainty factor as a function over distance. For a CMM using a touch probe, this relates to the repeatability of the probe and the accuracy of the linear scales. Typical probe repeatability can result in measurements within one micron or 0.00005 inch (half a ten thousandth) over the entire measurement volume. For 3, 3+2, and 5 axis machines, probes are routinely calibrated using traceable standards and the machine movement is verified using gauges to ensure accuracy.
Specific parts
Machine body
The first CMM was developed by the Ferranti Company of Scotland in the 1950s as the result of a direct need to measure precision components in their military products, although this machine only had 2 axes. The first 3-axis models began appearing in the 1960s (made by DEA of Italy and LK of the UK), and computer control debuted in the early 1970s, but the first working CMM was developed and put on sale by Browne & Sharpe in Melbourne, England. Leitz Germany subsequently produced a fixed machine structure with moving table.
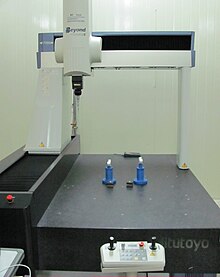
In modern machines, the gantry-type superstructure has two legs and is often called a bridge. This moves freely along the granite table with one leg (often referred to as the inside leg) following a guide rail attached to one side of the granite table. The opposite leg (often outside leg) simply rests on the granite table following the vertical surface contour. Air bearings are the chosen method for ensuring friction-free travel. In these, compressed air is forced through a series of very small holes in a flat bearing surface to provide a smooth-but-controlled air cushion on which the CMM can move in a nearly frictionless manner which can be compensated for through software. The movement of the bridge or gantry along the granite table forms one axis of the XY plane. The bridge of the gantry contains a carriage which traverses between the inside and outside legs and forms the other horizontal axis. The third axis of movement (Z axis) is provided by the addition of a vertical quill or spindle which moves up and down through the center of the carriage. The touch probe forms the sensing device on the end of the quill. The movement of the X, Y, and Z axes fully describes the measuring envelope. Optional rotary tables can be used to enhance the approachability of the measuring probe to complicated workpieces. The rotary table as a fourth drive axis does not enhance the measuring dimensions, which remain 3D, but it does provide a degree of flexibility. Some touch probes are themselves powered rotary devices with the probe tip able to swivel vertically through more than 180° and through a full 360° rotation.
CMMs are now also available in a variety of other forms. These include CMM arms that use angular measurements taken at the joints of the arm to calculate the position of the stylus tip, and can be outfitted with probes for laser scanning and optical imaging. Such arm CMMs are often used where their portability is an advantage over traditional fixed-bed CMMs: by storing measured locations, programming software also allows moving the measuring arm itself, and its measurement volume, around the part to be measured during a measurement routine. Because CMM arms imitate the flexibility of a human arm, they are also often able to reach the insides of complex parts that could not be probed using a standard three axis machine.
Mechanical probe
In the early days of coordinate measurement, mechanical probes were fitted into a special holder on the end of the quill. A very common probe was made by soldering a hard ball to the end of a shaft. This was ideal for measuring a whole range of flat-face, cylindrical, or spherical surfaces. Other probes were ground to specific shapes, for example a quadrant, to enable measurement of special features. These probes were physically held against the workpiece with the position in space being read from a 3-axis digital readout (DRO) or, in more advanced systems, being logged into a computer by means of a footswitch or similar device. Measurements taken by this contact method were often unreliable as machines were moved by hand and each machine operator applied different amounts of pressure on the probe or adopted differing techniques for the measurement.
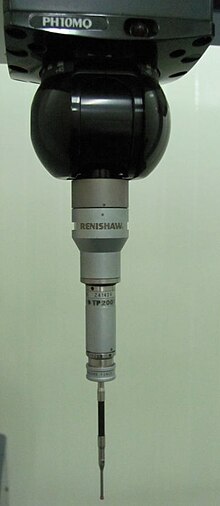
A further development was the addition of motors for driving each axis. Operators no longer had to physically touch the machine but could drive each axis using a handbox with joysticks in much the same way as with modern remote controlled cars. Measurement accuracy and precision improved dramatically with the invention of the electronic touch trigger probe. The pioneer of this new probe device was David McMurtry who subsequently formed what is now Renishaw plc. Although still a contact device, the probe had a spring-loaded steel ball (later ruby ball) stylus. As the probe touched the surface of the component, the stylus deflected and simultaneously sent the X,Y,Z coordinate information to the computer. Measurement errors caused by individual operators became fewer, and the stage was set for the introduction of CNC operations and the coming of age of CMMs.

Optical probes are lens-and-CCD systems, which are moved like the mechanical ones, and are aimed at the point of interest, instead of touching the material. The captured image of the surface will be enclosed in the borders of a measuring window, until the residue is adequate to contrast between black and white zones. The dividing curve can be calculated to a point, which is the wanted measuring point in space. The horizontal information on the CCD is 2D (XY) and the vertical position is the position of the complete probing system on the stand Z-drive (or other device component).
Scanning probe systems
There are newer models that have probes that drag along the surface of the part while taking points at specified intervals, known as scanning probes. This method of CMM inspection is often more accurate than the conventional touch-probe method and most times faster as well.
The next generation of scanning, known as noncontact scanning, which includes high speed laser single point triangulation, laser line scanning, and white light scanning, is advancing very quickly. This method uses either laser beams or white light that are projected against the surface of the part. Many thousands of points can then be taken and used not only to check size and position, but to create a 3D image of the part as well. This "point-cloud data" can then be transferred to CAD software to create a working 3D model of the part. These optical scanners are often used on soft or delicate parts or to facilitate reverse engineering.
- Micrometrology probes
Probing systems for microscale metrology applications are another emerging area. There are several commercially available coordinate measuring machines that have a microprobe integrated into the system, several specialty systems at government laboratories, and any number of university-built metrology platforms for microscale metrology. Although these machines are good and in many cases excellent metrology platforms with nanometric scales, their primary limitation is a reliable, robust, capable micro/nano probe. Challenges for microscale probing technologies include the need for a high-aspect-ratio probe giving the ability to access deep, narrow features with low contact forces so as to not damage the surface and high precision (nanometer level). Additionally, microscale probes are susceptible to environmental conditions such as humidity and surface interactions such as stiction (caused by adhesion, meniscus, and/or Van der Waals forces among others).
Technologies to achieve microscale probing include scaled-down version of classical CMM probes, optical probes, and a standing wave probe, among others. However, current optical technologies cannot be scaled small enough to measure deep, narrow features, and optical resolution is limited by the wavelength of light. X-ray imaging provides a picture of the feature but no traceable metrology information.
- Physical principles
Optical probes and laser probes can be used (if possible in combination), which change CMMs to measuring microscopes or multi-sensor measuring machines. Fringe projection systems, theodolite triangulation systems, and laser distance and triangulation systems are not called measuring machines, but the measuring result is the same: a space point. Laser probes are used to detect the distance between the surface and the reference point on the end of the kinematic chain (that is, the end of the Z-drive component). This can use an interferometrical function, focus variation, light deflection, or a beam-shadowing principle.
Portable coordinate-measuring machines
Whereas traditional CMMs use a probe that moves on three Cartesian axes to measure an object's physical characteristics, portable CMMs use either articulated arms or, in the case of optical CMMs, arm-free scanning systems that use optical triangulation methods and enable total freedom of movement around the object.
Portable CMMs with articulated arms have six or seven axes that are equipped with rotary encoders, instead of linear axes. Portable arms are lightweight (typically less than 20 pounds) and can be carried and used nearly anywhere. However, optical CMMs are increasingly being used in the industry. Designed with compact linear or matrix array cameras (like the Microsoft Kinect), optical CMMs are smaller than portable CMMs with arms, feature no wires, and enable users to easily take 3D measurements of all types of objects located almost anywhere.
Certain nonrepetitive applications such as reverse engineering, rapid prototyping, and large-scale inspection of parts of all sizes are ideally suited for portable CMMs. The benefits of portable CMMs are multifold. Users have the flexibility in taking 3D measurements of all types of parts and in the most remote and difficult locations. They are easy to use and do not require a controlled environment to take accurate measurements. Moreover, portable CMMs tend to cost less than traditional CMMs.
The inherent trade-offs of portable CMMs are manual operation (they always require a human to use them). In addition, their overall accuracy can be somewhat less accurate than that of a bridge-type CMM and is less suitable for some applications.
Multisensor-measuring machines
Traditional CMM technology using touch probes is today often combined with other measurement technology. This includes laser, video, or white light sensors to provide what is known as multisensor measurement.
Standardization
To verify the performance of a coordinate measurement machine, the ISO 10360 series is available. This series of standards defines the characteristics of the probing system and the length measurement error:
- PForm: probing deviation when measuring the form of a sphere
- PSize: probing deviation when measuring the size of a sphere
- EUni: deviation of measuring length on spheres from one direction
- EBi: deviation of measuring length on spheres from left and right
The ISO 10360 series consists of the following parts:
- ISO 10360-1 Geometrical product specifications (GPS) -- Acceptance and reverification tests for coordinate measuring machines (CMM) -- Part 1: Vocabulary
- ISO 10360-2 Geometrical product specifications (GPS) -- Acceptance and reverification tests for coordinate measuring machines (CMM) -- Part 2: CMMs used for measuring linear dimensions
- ISO 10360-7 Geometrical product specifications (GPS) -- Acceptance and reverification tests for coordinate measuring machines (CMM) -- Part 7: CMMs equipped with imaging probing systems
- ISO 10360-8 Geometrical product specifications (GPS) -- Acceptance and reverification tests for coordinate measuring systems (CMS) -- Part 8: CMMs with optical distance sensors
See also
- Outline of metrology and measurement
- List of measuring instruments
- Universal measuring machine
- 3D scanner
References
- "Coordinate Measuring Machine History – Fifty Years of CMM History leading up to a Measuring Revolution", COORD3 Metrology Archived 2013-09-08 at the Wayback Machine. Accessed 23 August 2013
- Renishaw: Biography
- "WIZprobe Kit". nextec-wiz.com. Archived from the original on 2010-11-01. Retrieved 2010-06-26.
- "Laser Scanners". HexagonMetrology.us. Retrieved 2013-04-23.
- "Chromatic White Light (CWS)". HexagonMetrology.us. Retrieved 2013-04-23.
- Hansen H.N.; Carneiro K.; Haitjema H.; De Chiffre L. (2006). "Dimensional Micro and Nano Metrology". CIRP Annals, 55-2, 721–743. doi:10.1016/j.cirp.2006.10.005.
{{cite journal}}: Cite journal requires|journal=(help) - Weckenmann A.; Peggs G.; Hoffmann J. (2006). "Probing systems for dimensional micro- and nano-metrology". Measurement Science and Technology. 17 (3). Meas. Sci. Technol. 17, 504–509: 504. Bibcode:2006MeScT..17..504W. doi:10.1088/0957-0233/17/3/S08. S2CID 110372649.
- M.B. Bauza; R.J. Hocken; S.T. Smith; S.C. Woody (2005). "The development of a virtual probe tip with application to high aspect ratio microscale features". Review of Scientific Instruments. 76 (9). Rev. Sci Instrum, 76 (9) 095112: 095112. doi:10.1063/1.2052027.
- "OGP Multi-Sensor Technology". www.ogpnet.com. Retrieved 2017-01-10.