This is an old revision of this page, as edited by Historyguy1138 (talk | contribs) at 20:29, 26 November 2024 (Added Information about the Battle of Moore's Creek Bridge). The present address (URL) is a permanent link to this revision, which may differ significantly from the current revision.
Revision as of 20:29, 26 November 2024 by Historyguy1138 (talk | contribs) (Added Information about the Battle of Moore's Creek Bridge)(diff) ← Previous revision | Latest revision (diff) | Newer revision → (diff) Battle tactic of Scottish Highland clans

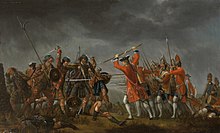
The Highland charge was a battlefield shock tactic used by the clans of the Scottish Highlands which incorporated the use of firearms.
Historical development

Prior to the 17th century, Highlanders fought in tight formations, led by a heavily armed warrior elite who carried heavy battle axes or claymores (two-handed swords whose name comes from the Scottish Gaelic claidheamh mòr, meaning "great sword").
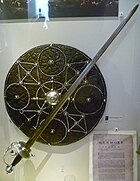
However, with the introduction of muskets and cannon, such formations became vulnerable. As a result, in the 17th century, Highlander warriors developed a lighter, one-handed, basket-hilted broadsword that protected the hand. This was generally used with a shield or targe strapped to the weak arm and a dirk or biotag ("long knife") held in the other hand.
The Scottish and Irish warrior Alasdair Mac Colla is sometimes credited with inventing the Highland charge during the Wars of the Three Kingdoms to meet a particular set of battlefield challenges. It was initially known as the Irish charge, due to the Irish component of Alasdair Mac Colla's Royalist military invasion of Covenanter Scotland. The use of the charge greatly resembled older Celtic fighting styles of battle in which one side would rush at the other in an attempt to break the line of battle.
The charge
The charge required a high degree of commitment as the men were rushing into musket range and would suffer casualties from at least one volley. Speed was essential, so the Highlanders preferred to employ the charge downhill and over firm ground; they removed clothing from their lower body for the same reason. They ran forward in clusters of a dozen (often blood relatives), which formed a larger, wedge-shaped formation. Once in effective musket range (60 yards), those with firearms would shoot; gun smoke from this mass discharge having obscured enemies' aim, the Highlanders obtained further protection from the expected return volley from the opposing force by crouching low to the ground immediately after firing. Then, firearms were dropped and edged weapons drawn, whereupon the men made the final rush on the enemy line with a Gaelic battle cry. Upon reaching striking distance, the Highlander would attempt to take the opponent's sword or bayonet point on his targe while lunging in low to deliver an upward thrust to his enemy's torso.
Bayonet technology and the charge
The Highlanders are of such a quick motion that if a battalion keep up his fire to be sure of (hitting) them, they are upon it before our men can come to the second defense, which is the bayonet in the muzzle of the musket.
Before the adoption of ring attachments for bayonets, the attachment consisted of a plug inserted into the barrel, which meant a musket could not be fired or reloaded with a fixed bayonet. During their charge Highlanders made a relatively instant transition from firearms to swords as they swiftly closed with the opposing force. Those enemy soldiers with plug attachments (some carried a pike) had only moments to fix bayonets while under psychological pressure from the onrushing Highlanders brandishing swords and roaring their war cries. At the 1689 Battle of Killiecrankie Scottish professional soldiers, veterans of the Dutch Republic's Scots Brigade, were overwhelmed by the Highland Jacobites of Clan Cameron; the Highlanders secured a complete victory by a charge which killed 2000 redcoats for the loss of 800 Highlanders.
The ring bayonet reduced the effectiveness of the Highland charge, but it remained an example of shock tactics, with the key factor being psychological; the charge aimed at causing some enemy troops in the opposing line to break ranks thereby leaving openings which could be exploited to 'roll up' the rest. This happened at the 1644 Battle of Tippermuir and the 1745 Battle of Falkirk Muir.
Culloden
One of the less successful uses of the Highland charge was in 1746 during the final confrontation of the Jacobite rising of 1745, the Battle of Culloden. The battle pitted the Jacobite forces of Charles Edward Stuart against an army commanded by Prince William, Duke of Cumberland loyal to the British government. The under-nourished and unpaid Jacobite force was badly outnumbered and outgunned by well-trained regular troops who maintained discipline when charged.
Against the advice of his military advisors, Charles Edward Stuart insisted on making a stand against the pursuing army of Cumberland on the open moorland of Culloden with the intention of fighting defensively, a decision that most historians have seen as playing into the hands of the government forces. The Jacobites failed to take advantage of the opportunity of attacking before the enemy had positioned their artillery and were ready for action. Cumberland's artillery bombarded the Jacobite army, which was stationary and exposed, until up to a third of Charles's men were dispersed or made casualties (including a groom decapitated while holding Charles Edward's horse). At this point – and without orders from the Jacobite command – Clan Mackintosh in the center of the Jacobite line began to charge. Donald Cameron of Lochiel led the Camerons to join them and some other clans followed in a spontaneous charge in which many failed to use their firearms. Despite canister shot and volleys, the charge reached – and in places broke through – the Government front line (though many Highlanders were without targes to protect from bayonets). However, Coehorn mortar shelling and devastating enfilade musket fire from the deeply echeloned government forces killed those who had made a breakthrough, while the others, after suffering heavy casualties, fell back in a retreat that quickly became a rout.
Battle of Moore's Creek Bridge
The last known time that the Highland Charge was implemented was in 1776 during the American Revolution in North Carolina at the Battle of Moore's Creek Bridge. In this engagement, a Battalion of Loyalist Royal Highland Emigrants under the command of Lieutenant Colonel Donald MacLeod and Captain John Campbell attempted a Highland Charge across a Bridge at Moore's Creek in an attempt to defeat Patriot Militia. The Patriots had previously removed some of the Bridges planking and greased the rails in order to slow an attack, and several men were cut down by Patriot fire before they could use their swords. The Loyalists retreated and hundreds were captured, ending in a crushing victory for the patriot forces.
See also
References
- Stevenson, David (1980). Alasdair MacColla and the Highland problem in the seventeenth century. Donald. ISBN 9780859760553.
- Hill (1999), pp. 214–5
- Hill, James Michael (1999). "Chapter 6 : Gaelic Warfare 1453-1815". In Black, Jeremy (ed.). European Warfare, 1450–1815 (Problems in Focus). London: Macmillan Press. pp. 201–224. ISBN 978-0333692240.
- Hill, James Michael (2003). Celtic Warfare, 1595-1763. J. Donald. ISBN 978-1-904607-02-1.
- Hugh Mackay cited in: Soldiers, A History of Men in Battle with Richard Holmes (New York: Viking Press, 1986) ISBN 0-670-80969-1 – page 66
- Ricketts, Howard, Firearms (London, 1965)
- Hill, James Michael, Celtic warfare, 1595–1763 (2003), J. Donald
- Carlton, Charles (1994), Going to the wars: the experience of the British civil wars, 1638–1651 page 135
- Highland Clansman 1689–1746 By Stuart Reid, p. 20-26
- Ricketts, Howard (1962). Firearms. Weidenfeld and Nicolson.
- Hill, James Michael, Celtic warfare, 1595–1763 (2003), J. Donald
- Carlton, Charles (2002). Going to the Wars: The Experience of the British Civil Wars 1638–1651. Routledge. ISBN 978-1-134-84935-2., page 135
- Black, Jeremy (1999) Britain as a military power 1688–1815 – page 28
- Black, Jeremy, Culloden and the '45(1990)
- Black, Jeremy (2007), A military history of Britain: from 1775 to the present -page 39
- Allison, Hugh G.,(2007), Culloden Tales: Stories from Scotland's Most Famous Battlefield, Mainstream Publishing
- Wilson, David K. (2005). The southern strategy: Britain's conquest of South Carolina and Georgia 1775-1780. Columbia (S.C.): University of South Carolina press. p. 28. ISBN 978-1-57003-573-9.
- "The last Scottish Highland broadsword charge ended terribly for the Highlanders". We Are The Mighty. 28 March 2022. Retrieved 26 November 2024.