| Battle of Cape Spada | |||||||
|---|---|---|---|---|---|---|---|
| Part of the Battle of the Mediterranean of the Second World War | |||||||
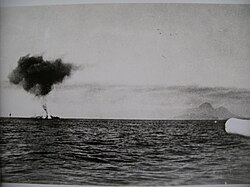
 Bartolomeo Colleoni sinking, 19 July 1940 | |||||||
| |||||||
| Belligerents | |||||||
|
|
| ||||||
| Commanders and leaders | |||||||
|
|
| ||||||
| Strength | |||||||
|
1 light cruiser 5 destroyers | 2 light cruisers | ||||||
| Casualties and losses | |||||||
|
1 wounded 1 light cruiser damaged |
121 killed 555 captured 1 light cruiser sunk | ||||||
| Battle of the Mediterranean | |
|---|---|
1940
1941
1942
1943
1944 1945 | |
| ¹ — Involved an Allied convoy or delivery mission ² — Involved an Axis convoy or delivery mission |
The Battle of Cape Spada was a naval battle between the Royal Navy and the Regia Marina during the Battle of the Mediterranean in the second World War. It took place on 19 July 1940 in the Mediterranean Sea off Cape Spada, the north-western extremity of Crete.
Prelude
Main article: Italian cruiser Bartolomeo ColleoniThe action occurred when a Commonwealth squadron patrolling the Aegean encountered two Italian cruisers en route from Tripoli to Leros, an Italian colony in the Dodecanese Islands. The Commonwealth squadron was commanded by the Australian Captain John Collins aboard the light cruiser HMAS Sydney with the H-class destroyers HMS Havock, Hyperion, Hasty, Hero and the similar I-class destroyer Ilex of the Royal Navy. The Italian 2nd Cruiser Division was commanded by Vice-Admiral Ferdinando Casardi aboard the fast light cruiser Giovanni delle Bande Nere which included Bartolomeo Colleoni, another light cruiser.
Battle
When the Italians encountered the Allied destroyers at about 07:30, Sydney and Havock were 40 mi (35 nmi; 64 km) to the north on a sweep for submarines. The other destroyers led the Italian cruisers on a chase northwards to give Sydney time to come to the rescue. Sydney sighted the Italians at 08:26, opening fire at 08:29, and the Italian cruisers turned away to the south-west. In the chase that followed, Bartolomeo Colleoni was hit several times by Sydney and a shell tore through her unarmored hull; the boilers and guns were disabled at 09:23, leaving her dead in the water.
The crew of Bartolomeo Colleoni fought on but were unable to manoeuvre or use the main armament; despite the fire from her 100 mm (3.9 in) guns, she was sunk by three torpedoes launched from Ilex and Hyperion at 09:59. Sydney continued to engage Bande Nere. Sydney was hit in the funnel by an Italian shell but hit Bande Nere at least twice, killing eight in the bow and the hangar. Later, Sydney disengaged because she was short of ammunition, Bande Nere returned to Benghazi, shadowed by the battleship HMS Warspite and a screen of destroyers.
Despite their speed advantage, the Italian cruisers failed to outrun Sydney because they had to steer south-southwest, instead of the most obvious route of escape to the south, to avoid being trapped between their opponents and the Cretan coast. This gave the Australian cruiser the chance to close the range. The light armour of Colleoni and Bande Nere was unable to withstand Sydney's shells. The lack of aerial reconnaissance was another factor contributing to the successful Commonwealth chase.
Aftermath
Casualties
Of the crew of Bartolomeo Colleoni there were 555 survivors but 121 men, including the captain, Umberto Novaro, were killed.
Subsequent operations
The British destroyers were bombed by Italian aircraft after the battle, damaging Havock, whose no. 2 boiler was flooded. A floatplane from Warspite, which was searching for Bande Nere, ditched in the sea and was lost near Tobruk, the crew being taken prisoner by the Italians. Allied Convoy AN 2 was ordered to sail back to Port Said and remain there until Bande Nere reached Benghazi.
Orders of battle
Italy
![]()
2nd Cruiser Division Regia Marina (Rear-Admiral Ferdinando Casardi)
Commonwealth
![]()
2nd Destroyer Flotilla Royal Navy (Captain John Collins)
Notes
- Ammiraglio di Divisione. equivalent to Vice-Admiral.
- Coulthard-Clark 2001, pp. 170–171.
- O'Sullivan, Fergus (13 July 2021). "The Battle of Cape Spada: The Australian Navy Proves Its Mettle". History Guild. Archived from the original on 10 November 2021.
- O'Hara 2009, p. 46.
- Greene & Massignani, pp. 84–85
- O'Hara 2009, p. 46.
- Titterton, p. 48
References
- Coulthard-Clark, Chris (2001). The Encyclopaedia of Australia's Battles. Sydney: Allen & Unwin. ISBN 1-86508-634-7.
- Greene, Jack; Massignani, Alessandro (1998). The Naval War in the Mediterranean, 1940–1943. London: Chatham. ISBN 1-86176-057-4.
- O'Hara, Vincent P. (2009). Struggle for the Middle Sea: The Great Navies at War in the Mediterranean Theater, 1940–1945. Annapolis, MD: Naval Institute Press. ISBN 978-1-59114-648-3.
- Titterton, G. A. (2002). The Royal Navy and the Mediterranean. Vol. II. London: Routledge. ISBN 0-7146-5179-6.
Further reading
- Brown, David (1995) . Warship Losses of World War Two (2nd rev. ed.). London: Arms and Armour Press. ISBN 1-85409-278-2.
- Playfair, I. S. O.; et al. (1959) . Butler, J. R. M. (ed.). The Mediterranean and Middle East: The Early Successes Against Italy (to May 1941). History of the Second World War, United Kingdom Military Series. Vol. I (4th impr. ed.). HMSO. OCLC 494123451. Retrieved 28 May 2018.
- Rohwer, Jürgen; Hümmelchen, Gerhard (2005) . Chronology of the War at Sea, 1939–1945: The Naval History of World War Two (3rd rev. ed.). London: Chatham. ISBN 1-86176-257-7.
External links
- Action off Cape Spada
- Scontro di Capo Spada (in Italian)