| Mechanical failure modes |
|---|
In materials science, the Charpy impact test, also known as the Charpy V-notch test, is a standardized high strain rate test which determines the amount of energy absorbed by a material during fracture. Absorbed energy is a measure of the material's notch toughness. It is widely used in industry, since it is easy to prepare and conduct and results can be obtained quickly and cheaply. A disadvantage is that some results are only comparative. The test was pivotal in understanding the fracture problems of ships during World War II.
The test was developed around 1900 by S. B. Russell (1898, American) and Georges Charpy (1901, French). The test became known as the Charpy test in the early 1900s due to the technical contributions and standardization efforts by Charpy.
History
In 1896, S. B. Russell introduced the idea of residual fracture energy and devised a pendulum fracture test. Russell's initial tests measured un-notched samples. In 1897, Frémont introduced a test to measure the same phenomenon using a spring-loaded machine. In 1901, Georges Charpy proposed a standardized method improving Russell's by introducing a redesigned pendulum and notched sample, giving precise specifications.
Definition

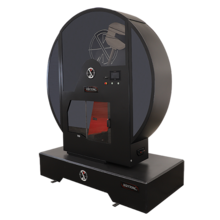
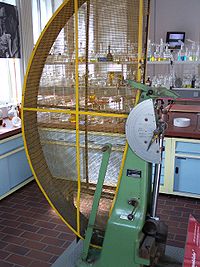
The apparatus consists of a pendulum of known mass and length that is dropped from a known height to impact a notched specimen of material. The energy transferred to the material can be inferred by comparing the difference in the height of the hammer before and after the fracture (energy absorbed by the fracture event).
The notch in the sample affects the results of the impact test, thus it is necessary for the notch to be of regular dimensions and geometry. The size of the sample can also affect results, since the dimensions determine whether or not the material is in plane strain. This difference can greatly affect the conclusions made.
The Standard methods for Notched Bar Impact Testing of Metallic Materials can be found in ASTM E23, ISO 148-1 or EN 10045-1 (retired and replaced with ISO 148-1), where all the aspects of the test and equipment used are described in detail.
Quantitative results
The quantitative result of the impact tests the energy needed to fracture a material and can be used to measure the toughness of the material. There is a connection to the yield strength but it cannot be expressed by a standard formula. Also, the strain rate may be studied and analyzed for its effect on fracture.
The ductile-brittle transition temperature (DBTT) may be derived from the temperature where the energy needed to fracture the material drastically changes. However, in practice there is no sharp transition and it is difficult to obtain a precise transition temperature (it is really a transition region). An exact DBTT may be empirically derived in many ways: a specific absorbed energy, change in aspect of fracture (such as 50% of the area is cleavage), etc.
Qualitative results
The qualitative results of the impact test can be used to determine the ductility of a material. If the material breaks on a flat plane, the fracture was brittle, and if the material breaks with jagged edges or shear lips, then the fracture was ductile. Usually, a material does not break in just one way or the other and thus comparing the jagged to flat surface areas of the fracture will give an estimate of the percentage of ductile and brittle fracture.
Sample sizes
According to ASTM A370, the standard specimen size for Charpy impact testing is 10 mm × 10 mm × 55 mm. Subsize specimen sizes are: 10 mm × 7.5 mm × 55 mm, 10 mm × 6.7 mm × 55 mm, 10 mm × 5 mm × 55 mm, 10 mm × 3.3 mm × 55 mm, 10 mm × 2.5 mm × 55 mm. Details of specimens as per ASTM A370 (Standard Test Method and Definitions for Mechanical Testing of Steel Products).
According to EN 10045-1 (retired and replaced with ISO 148), standard specimen sizes are 10 mm × 10 mm × 55 mm. Subsize specimens are: 10 mm × 7.5 mm × 55 mm and 10 mm × 5 mm × 55 mm.
According to ISO 148, standard specimen sizes are 10 mm × 10 mm × 55 mm. Subsize specimens are: 10 mm × 7.5 mm × 55 mm, 10 mm × 5 mm × 55 mm and 10 mm × 2.5 mm × 55 mm.
According to MPIF Standard 40, the standard unnotched specimen size is 10 mm (±0.125 mm) x 10 mm (±0.125 mm) x 55 mm (±2.5 mm).
Impact test results on low- and high-strength materials
The impact energy of low-strength metals that do not show a change of fracture mode with temperature, is usually high and insensitive to temperature. For these reasons, impact tests are not widely used for assessing the fracture-resistance of low-strength materials whose fracture modes remain unchanged with temperature. Impact tests typically show a ductile-brittle transition for high-strength materials that do exhibit change in fracture mode with temperature such as body-centered cubic (BCC) transition metals. Impact tests on natural materials (can be considered as low-strength), such as wood, are used to study the material toughness and are subjected to a number of issues that include the interaction between the pendulum and a specimen as well as higher modes of vibration and multiple contacts between pendulum tup and the specimen.
Generally, high-strength materials have low impact energies which attest to the fact that fractures easily initiate and propagate in high-strength materials. The impact energies of high-strength materials other than steels or BCC transition metals are usually insensitive to temperature. High-strength BCC steels display a wider variation of impact energy than high-strength metal that do not have a BCC structure because steels undergo microscopic ductile-brittle transition. Regardless, the maximum impact energy of high-strength steels is still low due to their brittleness.
See also
Notes
- ^ Meyers Marc A; Chawla Krishan Kumar (1998). Mechanical Behaviors of Materials. Prentice Hall. ISBN 978-0-13-262817-4.
- "The Design and Methods of Construction Of Welded Steel Merchant Vessels: Final Report of a (U.S. Navy) Board of Investigation". Welding Journal. 26 (7): 569. July 1947.
- Williams, M. L. & Ellinger, G. A (1948). Investigation of Fractured Steel Plates Removed from Welded Ships. National Bureau of Standards Rep.
- Siewert
- Cedric W. Richards (1968). Engineering materials science. Wadsworth Publishing Company, Inc.
- Kurishita H, Kayano H, Narui M, Yamazaki M, Kano Y, Shibahara I (1993). "Effects of V-notch dimensions on Charpy impact test results for differently sized miniature specimens of ferritic steel". Materials Transactions - JIM. 34 (11). Japan Institute of Metals: 1042–52. doi:10.2320/matertrans1989.34.1042. ISSN 0916-1821.
- Mills NJ (February 1976). "The mechanism of brittle fracture in notched impact tests on polycarbonate". Journal of Materials Science. 11 (2): 363–75. Bibcode:1976JMatS..11..363M. doi:10.1007/BF00551448. S2CID 136720443.
- ASTM E23 Standard Test Methods for Notched Bar Impact Testing of Metallic Materials
- ^ ISO 148-1 Metallic materials - Charpy pendulum impact test - Part 1: Test method
- ^ EN 10045-1 Charpy impact test on metallic materials. Test method (V- and U-notches)
- Mathurt KK, Needleman A, Tvergaard V (May 1994). "3D analysis of failure modes in the Charpy impact test". Modelling and Simulation in Materials Science and Engineering. 2 (3A): 617–35. Bibcode:1994MSMSE...2..617M. doi:10.1088/0965-0393/2/3A/014. S2CID 250853994.
- ASTM A370 Standard Test Methods and Definitions for Mechanical Testing of Steel Products
- Standard Test Methods for Metal Powders and Powder Metallurgy Products. Princeton, New Jersey: Metal Powder Industries Federation. 2006. pp. 53–54. ISBN 0-9762057-3-4.
- Polocoșer, Tiberiu; Kasal, Bohumil; Stöckel, Frank (2017-11-01). "State-of-the-art: intermediate and high strain rate testing of solid wood". Wood Science and Technology. 51 (6): 1479–1534. doi:10.1007/s00226-017-0925-6. ISSN 1432-5225.
- Polocoşer, Tiberiu; Kasal, Bohumil; Hallermann, Aljoscha; Li, Xinyi (2017-03-01). "What was Timoshenko's Small-Increment Method? With an Application to Low-Velocity Impact of a Wood Beam". Journal of Dynamic Behavior of Materials. 3 (1): 45–63. doi:10.1007/s40870-017-0093-7. ISSN 2199-7454.
- Polocoșer, T.; Kasal, B.; Li, X. (2017-09-01). "Design of Experiment and Pitfalls of Low-Velocity Pendulum Impact Testing". Journal of Dynamic Behavior of Materials. 3 (3): 436–460. doi:10.1007/s40870-017-0123-5. ISSN 2199-7454.
- Courtney, Thomas H. (2000). Mechanical Behavior of Materials. Waveland Press, Inc. ISBN 978-1-57766-425-3.