| Salamaua-Lae campaign | |||||||
|---|---|---|---|---|---|---|---|
| Part of the New Guinea Campaign of the Pacific Theater (World War II) | |||||||
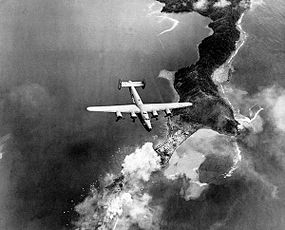
 A US Army Air Forces B-24 Liberator bomber, flying over explosions on the Salamaua Peninsula, where the port is located. | |||||||
| |||||||
| Belligerents | |||||||
|
|
| ||||||
| Commanders and leaders | |||||||
|
|
| ||||||
| Units involved | |||||||
|
| |||||||
| Strength | |||||||
| ~30,000 | ~10,000 | ||||||
| Casualties and losses | |||||||
|
Australia: 81 killed and 396 wounded | 11,600 killed, wounded or captured | ||||||
| Salamaua–Lae campaign | |
|---|---|
The Salamaua–Lae campaign was a series of actions in the New Guinea campaign of World War II. Australian and United States forces sought to capture two major Japanese bases, one in the town of Lae, and another one at Salamaua. The campaign to take the Salamaua and Lae area began after the successful defence of Wau in late January, which was followed up by an Australian advance towards Mubo as the Japanese troops that had attacked Wau withdrew to positions around Mubo. A series of actions followed over the course of several months as the Australian 3rd Division advanced north-east towards Salamaua. After an amphibious landing at Nassau Bay, the Australians were reinforced by a US regimental combat team, which subsequently advanced north up the coast.
As the Allies kept up the pressure on the Japanese around Salamaua, in early September they launched an airborne assault on Nadzab, and a seaborne landing near Lae, subsequently taking the town with simultaneous drives from the east and north-west. As the situation around Lae grew more desperate, the Salamaua garrison withdrew, and it was captured on 11 September 1943, while Lae fell shortly afterwards on 16 September, bringing the campaign to an end.
Background
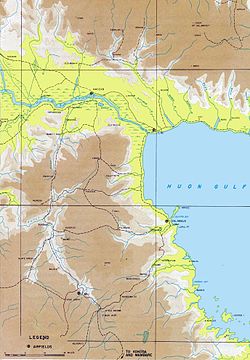
In March 1942, the Japanese secured Salamaua and Lae and subsequently established major bases on the north coast of New Guinea, in the large town of Lae, and in Salamaua, a small administrative town and port 35 kilometres (22 mi) to the south. Salamaua was a staging post for attacks on Port Moresby, such as the Kokoda Track campaign, and a forward operating base for Japanese aviation. When the attacks failed, the Japanese turned the port into a major supply base. Logistical limitations meant that the Salamaua–Lae area could garrison only 10,000 Japanese personnel: 2,500 seamen and 7,500 soldiers. The defences were centred on the Okabe Detachment, a brigade-sized force from the 51st Division under Major General Toru Okabe.
In January 1943, the Okabe Detachment was defeated in an attack on the Australian base of Wau, about 40 kilometres (25 mi) away. Allied commanders turned their attention to Salamaua, which could be attacked by troops flown into Wau. This also diverted attention from Lae, which was a major objective of Operation Cartwheel, the Allied grand strategy for the South Pacific. It was decided that the Japanese would be pursued towards Salamaua by the Australian 3rd Division, which had been formed at Wau, under the command of Major General Stanley Savige, who were to link up with elements of the US 41st Infantry Division.
Salamaua

Following the conclusion of the fighting around Wau in late January, the Okabe Detachment had withdrawn towards Mubo, where they began to regroup, numbering about 800 strong. Between 22 April and 29 May 1943, the Australian 2/7th Infantry Battalion, at the end of a long and tenuous supply line, attacked the southern extremity of Japanese lines in the Mubo area, at features known to the Allies as "The Pimple" and "Green Hill". While the 2/7th made little progress, they provided a diversion for Major George Warfe's 2/3rd Independent Company, which advanced in an arc and raided Japanese positions at Bobdubi Ridge, inflicting severe losses. In May, the 2/7th repelled a number of strong Japanese counterattacks.
At the same time as the first battle at Mubo, the Australian 24th Infantry Battalion, which had been defending the Wampit Valley in an effort to prevent Japanese movement into the area from Bulolo, detached several platoons to reinforce the 2/3rd Independent Company. During the month of May, they were heavily engaged in patrolling the 3rd Division's northern flank, around the Markham River, and the area around Missim, and one patrol succeeded in reaching the mouth of the Bituang River, to the north of Salamaua.
In response to the Allied moves, the Japanese Eighteenth Army commander, Lieutenant General Hatazō Adachi, sent the 66th Infantry Regiment from Finschhafen to reinforce the Okabe Detachment and launch an offensive. The 1,500-strong 66th attacked at Lababia Ridge, on 20–23 June. The battle has been described as one of the Australian Army's "classic engagements" of World War II. The ridge's only defenders were "D" Company of the 2/6th Battalion. The Australians relied on well-established and linked defensive positions, featuring extensive, cleared free-fire zones. These assets and the determination of "D" Company defeated the Japanese envelopment tactics.
Between 30 June and 19 August, the Australian 15th Infantry Brigade cleared Bobdubi Ridge. The operation was opened with an assault by the inexperienced 58th/59th Infantry Battalion, and included hand-to-hand combat. At the same time as the second Australian assault on Bobdubi, on 30 June – 4 July, the US 162nd Regimental Combat Team (162nd RCT), supported by engineers from the 2nd Engineer Special Brigade, made an unopposed amphibious landing at Nassau Bay and established a beachhead there, to launch a drive along the coast, as well as bringing ashore heavy guns with which to reduce the Japanese positions.

A week after the Bobdubi attack and Nassau Bay landing, the Australian 17th Brigade launched another assault on Japanese positions at Mubo. With the Allies making ground closer to Salamaua, the Japanese withdrew to avoid encirclement. The Japanese divisional commander, Hidemitsu Nakano, subsequently determined to concentrate his forces in the Komiatum area, which was an area of high ground to the south of Salamaua.
Meanwhile, the main body of the 162nd RCT followed a flanking route along the coast, before encountering fierce resistance at Roosevelt Ridge—named after its commander, Lieutenant Colonel Archibald Roosevelt—between 21 July and 14 August. Between 16 July and 19 August, the 42nd and 2/5th Infantry Battalions gained a foothold on Mount Tambu. They held on despite fierce Japanese counter-attacks. The battle turned when they were assisted by the 162nd RCT. Throughout July, the Japanese sought to reinforce the Salamaua area, drawing troops away from Lae; by the end of the month there were around 8,000 Japanese around Salamaua.
On 23 August, Savige and the 3rd Division handed over the Salamaua operation to the Australian 5th Division under Major General Edward Milford. Throughout late August and into early September the Japanese in the Salamaua region fought to hold the advancing Allies along their final line of defence in front of Salamaua, nevertheless the 58th/59th Infantry Battalion succeeded in crossing the Francisco River and the 42nd Infantry Battalion subsequently captured the main Japanese defensive position around Charlie Hill. After Allied landings near Lae in the first week of September, the 18th Army commander, Hatazō Adachi, ordered Nakano to abandon Salamaua and subsequently his forces withdrew to the north disinvesting the town and transferring between 5,000 and 6,000 troops by barge, while other troops marched out along the coastal road. The 5th Division subsequently occupied Salamaua on 11 September, securing its airfield.
The fighting between April and September in the Salamaua region cost the Australians 1,083 casualties, including 343 dead. The Japanese lost 2,722 killed and a further 5,378 wounded, for a total of 8,100 casualties. The US 162nd lost 81 killed and 396 wounded. Throughout the fighting, Allied aircraft and US PT boats supported the troops ashore, enforcing a blockade of the Huon Gulf and the Vitiaz and Dampier Straits.
Operation Postern

The codename for the main operations to take Lae was Operation Postern. Planned as part of wider operations to eventually secure the Huon Peninsula, the operation to capture Lae was planned by General Thomas Blamey, who assumed command of the Allied New Guinea Force, and Australian I Corps commander, Lieutenant General Sir Edmund Herring. This was a classic pincer movement, involving an amphibious assault east of the town, and an airborne landing near Nadzab, 50 kilometres (30 mi) to the west. Battle casualties for the 9th Division during Operation Postern amounted to 547, of which 115 were killed and 73 were posted as missing, and 397 were wounded, while the 7th Division suffered 142 casualties, of which 38 were killed. The Japanese lost about 1,500 killed, while a further 2,000 were captured.
Lae
Main article: Landing at LaeOn 4 September, the Australian 9th Division, under Major General George Wootten, landed east of Lae, on "Red Beach" and "Yellow Beach", near Malahang beginning an attempt to encircle Japanese forces in the town. Five US Navy destroyers provided artillery support. The landings were not opposed by land forces but were attacked by Japanese bombers, which inflicted numerous casualties amongst the naval and military personnel on board several landing craft.
The 20th Brigade led the assault, with the 26th following them up while the 24th formed the divisional reserve. The 9th Division faced formidable natural barriers in the form of rivers swollen by recent rain. They came to a halt at the Busu River, which could not be bridged; the 9th lacked heavy equipment, and the far bank was occupied by Japanese soldiers. On 9 September, the 2/28th Infantry Battalion led the attack across the Busu River and secured a bridgehead after fierce fighting.
Nadzab
Main article: Landing at Nadzab
The following day, the US 503rd Parachute Infantry Regiment, together with two gun crews from the Australian 2/4th Field Regiment—who had received a crash course in the use of parachutes—and their cut-down 25-pounder artillery pieces, made an unopposed parachute drop at Nadzab, just west of Lae. The airborne forces secured Nadzab Airfield, so that the Australian 7th Division, under Major General George Vasey, could be flown in, to cut off any possible Japanese retreat into the Markham Valley. The 7th Division suffered its worst casualties of the campaign on 7 September, as they were boarding planes at Port Moresby: a B-24 Liberator bomber crashed while taking off, hitting five trucks carrying members of the 2/33rd Infantry Battalion: 60 died and 92 were injured.
On 11 September, the 7th Division's 25th Infantry Brigade engaged about 200 Japanese soldiers entrenched at Jensen's Plantation in a firefight, at a range of 50 yards (46 m), with the 2/4th Field Regiment providing artillery support. After defeating them and killing 33 enemy soldiers, the 25th Infantry Brigade engaged and defeated a larger Japanese force at Heath's Plantation, killing 312 Japanese soldiers. It was at Heath's Plantation that Private Richard Kelliher won the Victoria Cross, the highest award for gallantry in the British Commonwealth. The 25th Infantry Brigade entered Lae on 15 September, just before the 9th Division's 24th Infantry Brigade. The two units linked up that day.
Aftermath

While the fall of Lae was clearly a victory for the Allies, and it was achieved more quickly and at lower cost than anticipated, a significant proportion of the Japanese garrison had escaped through the Saruwaged Range, to the north of Lae, and would have to be fought again elsewhere. The Huon Peninsula campaign was the result, and a quick follow up landing was subsequently undertaken at Scarlet Beach by the 20th Brigade.
Despite initial plans to do so, Salamaua was not developed as a base. The Australian I Corps commander, Lieutenant General Sir Edmund Herring, visited Salamaua by PT boat on 14 September, three days after its capture, and found little more than bomb craters and corrugated iron. He recommended cancelling the development of Salamaua and concentrating all available resources on Lae. The base that had originally been envisaged now looked like a waste of effort, because Salamaua was a poor site for a port or airbase. However, in drawing the Japanese attention away from Lae at a critical time, the assault on Salamaua had already served its purpose.
Lae, on the other hand, was subsequently transformed into two bases: the Australian Lae Base Sub Area and the USASOS Base E. Herring combined the two as the Lae Fortress, under Milford. Because Blamey had launched Postern before the logistical preparations were complete, most of the units needed to operate the base were not yet available.
The importance of Lae as a port was to supply the airbase at Nadzab, but this was compromised because the Markham Valley Road was found to be in poor condition. To expedite the development of Nadzab, minimal efforts were made to repair it, and heavy military traffic bound for Nadzab was permitted to use it. The road was closed following heavy rains on 7 October and did not reopen until December. Until then, Nadzab had to be supplied by air, and its development was slow because heavy engineer units could not get through.
Notes
- ^ Coulthard-Clark 1998, p. 241.
- ^ Dexter 1961, p. 392.
- ^ James 2014, p. 206.
- James 2014, p. 189.
- "Attitudes to the War – Southern Cross: X The Attack and Defence at Lae and Salamaua". Australia-Japan Research Project. Australian War Memorial. Archived from the original on 25 May 2010. Retrieved 7 October 2014.
- Trigellis-Smith 1994, pp. 313–316.
- Dexter 1961, p. 16.
- Keogh 1965, pp. 298 & 304.
- ^ Morison 1975, p. 258.
- Tanaka 1980, p. 46.
- ^ Coulthard-Clark 1998, pp. 239–240.
- "24th Battalion (Kooyong Regiment)". Second World War, 1939–1945 units. Australian War Memorial. Retrieved 23 January 2016.
- Dexter 1961, p. 50.
- Dexter 1961, p. 53.
- Coulthard-Clark 1998, p. 240.
- ^ "On This Day – 20 June". Army History Unit. Australian Army. Archived from the original on 8 August 2008.
- Dexter 1961, pp. 107–113.
- Trigellis-Smith 1994, p. 221.
- Dexter 1961, p. 138.
- Dexter 1961, p. 107.
- Tanaka 1980, p. 161.
- Dexter 1961, pp. 183–184.
- Maitland 1999, pp. 72–74.
- Tanaka 1980, pp. 171–175.
- Keogh 1965, pp. 309–310.
- Horner 1998, pp. 407–409.
- Keogh 1965, pp. 298–311.
- Bradley 2010, p. 48.
- Keogh 1965, pp. 306–307.
- Keogh 1965, p. 305.
- Maitland 1999, p. 78.
- "2/33rd Battalion". Second World War units, 1939–1945. Australian War Memorial. Retrieved 6 October 2013.
- Morley, Dave (26 September 2013). "The Tragic Story of Nadzab". Army News: The Soldiers' Newspaper (1314 ed.). p. 21.
- ^ "No. 36305". The London Gazette (Supplement). 28 December 1943. p. 5649.
- Buggy 1945, p. 242.
- Keogh 1965, pp. 310–315.
- Keogh 1965, p. 315.
- ^ Dexter 1961, pp. 400–403.
- Historical Section, Army Forces Western Pacific. "Military History of the United States Army Services of Supply in the Southwest Pacific: Chapter 18: Base at Lae Until March 1944". United States Army Center of Military History. Archived from the original on 14 December 2016. Retrieved 25 January 2016.
References
- Bradley, Phillip (2010). To Salamaua. Port Melbourne, Victoria: Cambridge University Press. ISBN 978-0521763905.
- Buggy, Hugh (1945). Pacific Victory: A Short History of Australia's Part in the War Against Japan. North Melbourne, Victoria: Victorian Railway Printing Works. OCLC 2411075.
- Coulthard-Clark, Chris (1998). The Encyclopaedia of Australia's Battles. Sydney, New South Wales: Allen & Unwin. ISBN 1-86448-611-2.
- Dexter, David (1961). The New Guinea Offensives. Australia in the War of 1939–1945. Series 1 – Army. Vol. 6. Canberra: Australian War Memorial. OCLC 2028994.
- Horner, David (1998). Blamey: The Commander-in-Chief. St Leonards, New South Wales: Allen & Unwin. ISBN 1-86448-734-8. OCLC 39291537.
- James, Karl (2014). "The 'Salamaua Magnet'". In Dean, Peter (ed.). Australia 1943: The Liberation of New Guinea. Port Melbourne, Victoria: Cambridge University Press. pp. 186–209. ISBN 978-1-107-03799-1.
- Keogh, Eustace (1965). South West Pacific 1941–45. Melbourne, Victoria: Grayflower Publications. OCLC 7185705.
- Maitland, Gordon (1999). The Second World War and its Australian Army Battle Honours. East Roseville, New South Wales: Kangaroo Press. ISBN 0-86417-975-8.
- Morison, Samuel Eliot (1975) . Breaking the Bismarcks Barrier. History of United States Naval Operations in World War II. Vol. VI. Boston: Little, Bown and Company. OCLC 21532278.
- Tanaka, Kengoro (1980). Operations of the Imperial Japanese Armed Forces in the Papua New Guinea Theater During World War II. Tokyo: Japan Papua New Guinea Goodwill Society. OCLC 9206229.
- Trigellis-Smith, Syd (1994) . All the King's Enemies: A History of the 2/5th Australian Infantry Battalion. Ringwood East, Victoria: 2/5 Battalion Association. ISBN 978-0731610204.
Further reading
- Miller, John (1959). Cartwheel: The Reduction of Rabaul. United States Army in World War II: The War in the Pacific. Washington DC: Office of the Chief of Military History, Department of the Army. OCLC 1355535.
- Milner, Samuel (1957). Victory in Papua (PDF). United States Army in World War II: The War in the Pacific. Washington DC: Office of the Chief of Military History, Department of the Army. ISBN 1-4102-0386-7. Archived from the original (PDF) on 6 May 2017. Retrieved 5 December 2015.
- Conflicts in 1943
- 1943 in Papua New Guinea
- Territory of New Guinea
- South West Pacific theatre of World War II
- Battles and operations of World War II involving Australia
- Battles and operations of World War II involving the United States
- Battles and operations of World War II involving Papua New Guinea
- Battles and operations of World War II involving Japan
- World War II aerial operations and battles of the Pacific theatre
- Operation Cartwheel