| Second Battle of the Hook | |||||||
|---|---|---|---|---|---|---|---|
| Part of the Korean War | |||||||
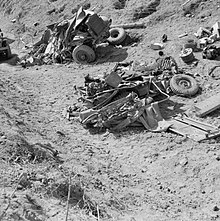
 Wreckage of a jeep & a lorry at "The Hook". Centurion tanks ran straight over them in order to support the hard pressed 1st Battalion, The Black Watch | |||||||
| |||||||
| Belligerents | |||||||
|
| ||||||
| Commanders and leaders | |||||||
|
| Unknown | ||||||
| Units involved | |||||||
| elements of 118th Division | |||||||
| Casualties and losses | |||||||
| 107 killed, wounded and missing | UN Claim: 700 killed and wounded | ||||||
The Second Battle of the Hook was fought between 18 and 19 November 1952 during the Korean War between elements of United Nations Command (UN) troops consisting of British and Canadian troops of the 1st Commonwealth Division and Chinese forces on a vital sector known as the "Hook" position which was the scene of much bitter fighting before and in the ensuing months. Attacking Chinese forces attempted to take the strategic position but were repelled by a combination of heavy firepower and effective counterattacks.
Background
On 14 April 1952 as a result of adjustments under Operation Westminster the 1st Commonwealth Division was deployed. The advanced party of 1st Black Watch had arrived in the divisional area on 8 June and by 22 June the battalion, under the command of Lieutenant Colonel David McNeil Campbell Rose, had completed its concentration and it was arranged that training should be completed by 7 July, after which the Black Watch would join the 29th British Infantry Brigade.
Under plan "Sovereign" the Commonwealth Division received orders on 23 October to take over the sector of the right battalion of the 1st US Marine Division west of the Samichon River. The US Marines on a highly strategic crescent shaped ridge known as the Hook had already defeated a Chinese People's Volunteer Army (PVA) attack known as the First Battle of the Hook a few days before and needed to be replaced for rest. This left sector was to become the responsibility of 29th brigade and to the extreme right, 2,000 yards (1,800 m) of its line between the Imjin and Kowang-san, was handed over to the Republic of Korea Army (ROK) 1st Infantry Division. This right sector became the responsibility of 28th Brigade with the Canadian 25th Infantry Brigade moving into reserve. The positions, particularly after the US marine battle, had been so battered that many in the Black Watch found the defenses to be of little use. Koreans KATCOM's helped to shore up the defenses over the coming days, sometimes under shell fire.
Battle
On 18 November at about 19:00 two companies of PVA infantry were spotted by a standing patrol on Outpost Warsaw, 500 yards (460 m) below the forward positions on the Hook. They radioed a warning back, but the patrol was quickly attacked and neutralized by the PVA; half an hour later the company deployed on the Hook was attacked from three different directions.
Troops from the Duke of Wellington's Regiment watched the battle from their positions on Yong Dong, 2,500 yards (2,300 m) away, and laid into the PVA with their machine guns firing on fixed lines over the Samichon valley and across the Black Watch for over eleven hours. In addition the divisional artillery pounded the positions in front of the Scots and continued throughout the night. By the end of this time over 50,000 rounds had been expended and a lull in the battle came shortly before midnight as the PVA appeared to have withdrawn. Within half an hour a bugle announced their return; grenades being thrown along with exploding shells and machine gun fire raged with the PVA being plainly visible in the searchlights.
Some of the searchlights were knocked out making it increasingly hard to find suitable targets both for artillery and small arms. The PVA managed to get a footing on the position under the pressure of repeated attack on a very narrow front. Despite counterattacks by the Black Watch they were forced back by sheer weight of numbers. Rose called on a counterattack with a search and clearance operation using Centurion tanks of the B Squadron, 5th Royal Inniskilling Dragoons; one tank was knocked out but the Black Watch and the Canadian 3 PPCLI started to clear the Hook of the PVA and the fighting was still going on at dawn.
The Scots pressed forward, and having failed to consolidate their positions the PVA were not prepared to carry on the fight in daylight and they withdrew, as battlefield clearance squads moved in take out the PVA wounded. A few of the Scots had been captured when the forward platoons were overrun, but most had stayed safe in their tunnels and dugouts when their positions were known to be lost and occupied or overrun by the PVA. With the daylight now strong the battle ended with the British and Canadian troops having retained the position.
Aftermath

For a second time, the PVA had failed to evict UN forces from the Hook. Canadian forces, the Princess Patricia's Canadian Light Infantry that had regained the crucial position with the Black Watch, took over their positions so they could rest and take care of the casualties. PVA attacks continued throughout the rest of the year and into 1953, at the end of January US troops relieved the Commonwealth Division on the line and the Division was pulled back to rest, reorganize and retrain.
The Black Watch returned after two months, and deployed to the Hook with one Rifle company being deployed on each of the features' four hills, Point 121, the Hook, the Sausage and Point 146. Another rifle company was loaned from the Dukes to be deployed on Point 146. The Black Watch found the Hook to be the same as when they left it; a constant barrage of shelling with the PVA habitually targeting the supply route leading up to the back of the ridge, a large proportion of their shells landing close to the Black Watch Command Post. The PVA artillery was based in a semi-circle of hills opposite the Hook, the guns were kept in tunnels, manhandled out to fire and then quickly pushed back again to safety away from UN counter bombardment and air attacks. The Dukes relieved the Black Watch on the night of 12/13 May 1953 and expected to be attacked at any time. They fought the Third Battle of the Hook two weeks later.
See also
References
- Citations
- ^ Jacques p 455
- ^ Dutton pp 206-07-42
- "Lieutenant-Colonel David Rose". Daily Telegraph. 26 October 2010. Retrieved 10 October 2013.
- ^ Grey pp 143-44
- ^ Barker pp 32-42
- ^ Johnston pp 328-29
- Bibliography
- Barker, A J (2001). Fortune Favours the Brave: The Battles of the Hook Korea 1952-53. Pen and Sword. ISBN 9780850528237.
- Dutton, John (2007). Korea 1950-53 Recounting Reme Involvement. Lulu.com. ISBN 9780955675300.
- Jaques, Tony (2006). Dictionary of Battles and Sieges: A Guide to 8500 Battles from Antiquity Through the Twenty-first Century. Greenwood Press. ISBN 978-0313335365.
- Johnston, William (2011). A War of Patrols: Canadian Army Operations in Korea: Studies in Canadian Military History Series. UBC Press. ISBN 9780774841061.
- Grey, Jeffrey (1990). The Commonwealth Armies and the Korean War: An Alliance Study War, Armed Forces and Society Series Edition. Manchester University Press. ISBN 9780719027703.
- External links
- 1DWR War Diaries in WO 308/53, The National Archives, London
- Royal Engineers Museum Royal Engineers and the Cold War (Korean War)
- Royal Engineers Museum Royal Engineer pictures of the Korean War.
- Duke of Wellington's Regimental, Battle Honours, Korea and The Hook, 1952 – 1953
38°01′44.8″N 126°50′33″E / 38.029111°N 126.84250°E / 38.029111; 126.84250
Categories: