This page displays the formation signs of higher formations (above division) of the British Army during the First and Second World Wars, and after. For completeness it also shows those signs of Commonwealth and Empire formations which fought alongside the British, and multi national formations they were a part of. In addition to the field forces, lines of communication and home rear echelon formation signs are also shown.
First World War
Armies and Corps used the pre-existing scheme of red and black or red and white for army and corps respectively, with a number applied as an identifier. When this insecure method of identification was banned by order in 1916, other signs were used, but the army and corps colours continued to be used in some cases. These designs were used as vehicle signs and on notices, and not sewn directly on to the uniform. Army and Corps command personnel wore armbands when required (red-black-red for army or red-white-red for corps) to which was added the relevant sign.
Army
-
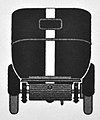 First Army
Applied to vehicles. -
 Second Army
-
 Third Army
-
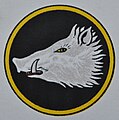 Fourth Army
-
 Fifth Army
First design. -
 Fifth Army
Second design.
Corps
-
 I Corps
-
 II Corps
-
 III Corps
-
 IV Corps
-
 V Corps
-
 VI Corps
-
 VII Corps
-
 VIII Corps
-
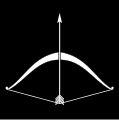 IX Corps
-
 X Corps
-
 XI Corps
-
 XIII Corps
-
 XIV Corps
-
 XV Corps
-
 XVII Corps
-
 XVIII Corps
-
 XIX Corps
-
 XX Corps
-
 XXI Corps
-
 XXII Corps
Commonwealth and Empire
-
 Australian Corps
1918-1919. -
 I Corps (British India)
Second World War

By the start of the Second World War, the British Army prohibited all identifying marks on its Battle Dress uniforms save for drab (black or white on khaki) regimental or corps (branch) slip-on titles, and even these were not to be worn in the field. In May 1940 an order (Army Council Instruction (ACI) 419) was issued banning division signs worn on uniforms, even though some were in use on vehicles in France.
In September 1940 the order was replaced with ACI 1118, and formation signs were permitted to be worn on uniform below the shoulder title by those troops in independent brigades, divisions, (field) corps and command headquarters. Below this, troops of the British Army wore an 'arm of service' stripe (2 inches (5.1 cm) by 1⁄4 inch (0.64 cm)) showing the relevant corps colour (for the higher formations, these were most often the supporting arms, for example Engineers, red and blue, Service Corps, blue and yellow, RAMC dark cherry, and so on, see right).
Until D-Day these signs were only to be displayed or worn in Britain, if a formation went overseas all formation markings had to be removed from vehicles (tactical signs excepted) and uniforms. This order was obeyed to varying degrees in various theatres of war. However all 21st Army Group formations wore their signs when they went to France.
In the British Army, ACI 1118 specified that the design for the formation sign should be approved by the general officer commanding the formation and reported to the War Office. A further order of December 1941 (ACI 2587) specified the material of the uniform patch as printed cotton (ordnance issue), this replaced the embroidered felt (or fulled wool) or metal badges used previously. In other theatres the uniform patch could be made from a variety of materials including printed or woven cotton, woven silk, leather or metal embroidered felt (or fulled wool).
General Head Quarters and Theatre
-
 GHQ Home Forces.
-
 Canadian Military Headquarters in Britain.
-
 GHQ Middle East Command.
Used as vehicle sign only. -
 Persia and Iraq Command
-
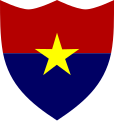 GHQ India. Also worn as a rectangular badge.
-
 Allied Force Headquarters
-
 SHAEF
SHAEF
-
 South East Asia Command
Army group

.
-
 Allied Land Forces South East Asia
Previously 11th Army Group. Anglo Indian Chinese American. -
 Headquarters 15th Army Group
Anglo American. -
 Headquarters 21st Army Group
Anglo Canadian.
Army

-
 First Army
-
 Second Army
-
 Eighth Army
-
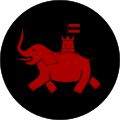 Ninth Army
-
Tenth Army
-
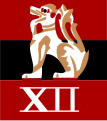 Twelfth Army
-
 Fourteenth Army
-
 First Allied Airborne Army
Commonwealth and Empire
-
 First Canadian Army
-
First Australian Army
-
 Second Australian Army
-
 North-Western Army (India)
1942-1945, converted from, and back into, Northern Command (India). -
 Southern Army (India)
1942-1945, converted from, and back into, Southern Command (India).
Commands
U.K., Commonwealth and Empire
Commands were notionally of Army level, some choosing army command colours (red and black) and in the U.K. in the early years of the war could command one or more corps as 'Corps districts'. In Southern Command (United Kingdom) the colouring of the shield and sometimes the stars was varied according to the wearers arm of service, 18 second world war varieties are known including the headquarters, and the Auxiliary Territorial Service.
Shown below are the commands on the territory of the United Kingdom, Commonwealth or Empire nations.
-
 Northern Command (United Kingdom)
-
 Eastern Command (United Kingdom)
-
 South-Eastern Command (United Kingdom)
1941-1944. -
 Southern Command (United Kingdom)
Vehicle sign. -
 Southern Command (United Kingdom)
Uniform patch. -
 Western Command (United Kingdom)
-
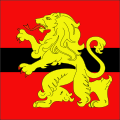 Scottish Command
HQ staff. -
 Scottish Command, other troops.
-
 Anti-Aircraft Command
First pattern. -
 Anti-Aircraft Command
Second pattern. -
 Atlantic Command (Canada)
-
 Pacific Command (Canada)
-
 Northern Command (India)
-
 Central Command (India)
1942-1946. -
 West Africa command
-
 East Africa Command
Corps
The corps formation sign would be worn by headquarters and any attached troops, that is, those not in a division, independent infantry or armoured brigade, an Army Group Royal Artillery or a lines of communication formation. After the B.E.F.'s return from France, existing and newly formed Corps (I - XII) were allocated districts, and known as 'Corps districts', under the existing Home Commands, as shown below. They were replaced by military districts during 1942 and 1943. Not shown are VI Corps, based in Northern Ireland and VII Corps based around Oxfordshire and Gloucestershire, neither had a formation sign as a real formation and both were disbanded before the end of 1940.
The appropriate arm of service strip would be worn below the sign on a uniform (see above), with the exception of some (service) corps in I Corps, which altered the colours of the diamond as appropriate. For example, engineers (two diagonal blue stripes on the diamond), signals (a blue diamond), artillery (diamond halved vertically, blue and red) and service corps (diamond halved horizontally blue on yellow).
-
 I Corps
I Corps district, the East Midlands. -
 II Corps
II Corps district, the Wash-East Anglia. -
 III Corps
III Corps district, West Midlands-Wales -
 IV Corps
IV Corp district, southern Midlands. -
 V Corps
V Corps district, Dorset-Isle of Wight. -
 VIII Corps
VIII Corps District, Devon and Cornwall, First pattern. -
 VIII Corps
Second pattern from 1943 as a field Corps. -
 IX Corps
IX Corps district, Northumbria. -
 X Corps
X Corps district, Yorkshire, First pattern. -
 X Corps
Second pattern. -
 XI Corps
XI Corps district, East Anglia-Thames estuary. -
 XII Corps
XII Corps district, Kent and Sussex. -
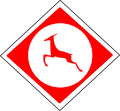 XIII Corps
-
 XXX Corps
-
 I Anti-Aircraft Corps
-
 II Anti-Aircraft Corps
-
 III Anti-Aircraft Corps
Commonwealth and Empire
The Canadian and Australian uniform signs shown below are the headquarters signs. Canadian attached troops indicated their (service) corps with the addition of letters (for example R C E for the Royal Canadian Engineers or a maroon stripe for the Royal Canadian Medical Service). Australian attached troops indicated their (service) corps by replacing the black and white triangles with their corps colour (I Corps), or central triangle (II and III Corps) and replacing the black triangle with the green or red of the field corps, for example purple for the Royal Australian Engineers or brown for the Australian Army Medical Corps.
-
 I Canadian Corps
Vehicle sign. -
 I Canadian Corps
-
 II Canadian Corps
Vehicle sign. -
 II Canadian Corps
-
 I Corps (Australia)
-
 II Corps (Australia)
-
 III Corps (Australia)
-
 XV Indian Corps
-
 XXI Indian Corps
-
 XXXIII Indian Corps
-
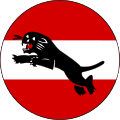 XXXIV Indian Corps
Districts
Military districts, the level below area commands were constantly changing, the signs below do not show a 'snap-shot' in time for any command area. Being local formations, the signs reference local attributes such as history, geography, industry, regimental affiliations and heraldry.
Britain
-
 Northumbrian district (Northern Command).
-
 West Riding district (Northern Command).
-
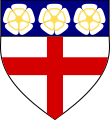 North Riding district (Northern Command).
-
 North Midlands district (Northern Command).
-
 East Riding and Lincolnshire District (Northern Command).
-
 Central Midlands district (first pattern), (Eastern Command).
-
 Central Midlands district, East Central district (Eastern Command).
-
 Essex and Suffolk district (Eastern Command).
-
 Norfolk and Cambridge district
(Eastern Command). -
 North Kent and Surrey district (South Eastern Command).
-
 Sussex and Surrey district (South eastern Command).
-
 East Kent district (South Eastern Command),
Home Counties district (Southern Command). -
 Hampshire and Dorset district, Aldershot and Hampshire district (Southern Command).
-
 Salisbury district (Southern Command).
-
 South-Western district (Southern Command).
From 1943. -
 South Midland district (Southern Command).
-
 Lancashire and Border district
(Western Command). -
 North Wales district (Western Command).
-
 South Wales district (Western Command).
-
 West Lancashire district (Western Command).
-
 London district.
-
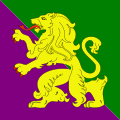 North Highland district (Scottish Command).
-
 South Highland district (Scottish Command).
-
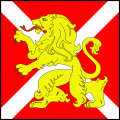 West Scotland district (Scottish Command).
-
 Edinburgh Area 1939-1941, Lothian and Border district 1941-1944, East Scotland district.
(Scottish Command) -
 Orkney and Shetland Defences.
-
 Northern Ireland district (1st pattern).
-
 Northern Ireland district (2nd pattern).
India
-
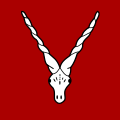 Baluchistan District, (Northern Command).
-
 Kohat District, (Northern Command).
-
 Peshawar District.(Northern Command).
-
 Waziristan District, (Northern Command).
-
 Delhi District, (Central Command).
-
 Lahore District, (Central Command).
-
 Nagpur District, (Central Command).
-
 United Provinces Area, (Central Command).
-
 Sind District (Western Independent District, Central Command).
Mediterranean and Middle East
-
 Cyreniaca District, Libya.
-
 North Levant District, Syria. (Reused the Ninth Army sign on its disbanding.)
-
 No.3 District, Naples, Central Mediterranean Force
Lines of Communications
Depending on the theatre of operations these units could be under command of the Theatre, Army Group or Army. The Australian signs show the headquarters design for that formation, attached troops wore an additional colour/shape combination (for example, Service Corps sections wore a white on blue design in the centre of the patch).
-
 21st Army Group HQ Lines of Communications.
-
 21st Army Group Lines of Communications troops.
-
 No. 15 Area Middle East Forces (Palestine).
-
 Headquarters LoC South East Asia Command (used by South Burma District Post War).
-
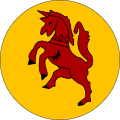 101st Lines of Communication Area (Bihar and Orissa).
-
 105th Lines of Communication Area (Madras).
-
 106th Lines of Communication (Hyderabad).
-
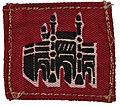 107th Lines of Communication Area (Bombay).
-
 109th Lines of Communication Area (Bangalore).
-
 110th Lines of Communication Area (Poona)
-
 202nd Lines of Communication Area (Assam)
-
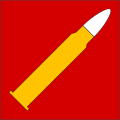 303rd Lines of Communication Area (Bengal)
-
 404th Lines of Communication Area (East Bengal)
-
 505th Lines of Communication Area (Following Fourteenth Army)
-
 New Guinea (Australia) Lines of Communication
-
 Northern Territory (Australia) Lines of Communication
-
 Tasmania (Australia) Lines of Communication
-
 Western Australia Lines of Communication
-
 South Australia Lines of Communication
-
 Victoria (Australia) Lines of Communication
-
 New South Wales (Australia) Lines of Communication
-
 Queensland (Australia) Lines of Communication
Post War
Armies and Commands
-
 BAOR
BAOR
-
 Northern Command.
-
 Eastern Command.
-
 Southern Command.
-
 Western Command.
-
 Scottish Command.
-
 Anti-Aircraft Command.
Corps and Districts
-
 I Corps.
-
 XXI (Northern) Corps Territorial Army.
-
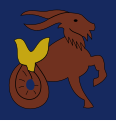 XXIII (Southern) Corps Territorial Army.
-
 Northunbrian district (Northern Command).
-
 North Midlands district (Northern Command).
-
 East and West Riding (Yorkshire) district (Northern Command).
-
 East Anglian district (Eastern Command).
-
 Home Counties district (Eastern Command).
-
 Aldershot District (Southern Command).
-
 Salisbury Plain district (Southern Command).
-
 South-Western district (Southern Command).
First pattern to 1953. -
 South-Western District (Southern Command)
Second pattern from 1953. -
 North Western district
(Western Command). -
 Mid Western district (Western Command).
-
 London district.
-
 Highland district
(Scottish Command). -
 Lowland district
(Scottish Command). -
 Northern Ireland District.
References
- JPS Card nos. 27, 52, 56
- JPS card No. 95
- JPS card no. 27
- JPS card no. 33
- JPS card no. 81
- ^ JPS card no. 78
- JPS card no. 92
- ^ JPS card no. 29
- JPS card no. 53
- JPS card no. 61
- JPS card no. 96
- JPS card no. 38
- JPS card no. 70
- JPS card no. 87
- JPS card no. 56
- JPS card no. 3
- JPS card no. 74
- JPS card no. 22
- JPS card no. 75
- JPS card no. 68
- JPS card no. 82
- JPS card no. 25
- JPS card no. 93
- JPS card no. 16
- JPS card no. 40
- Glyde No. 9
- JPS card no. 101
- Davis p. 92
- Davis pps. 94-95, 97
- Cole p. 9
- Davis pps. 95, 97
- Davis pp. 99-100
- ^ Cole p. 14
- ^ Cole p. 60
- ^ Cole p. 21
- ^ Cole p. 15
- ^ Cole p. 16
- Cole p. 23
- ^ Cole p. 24
- ^ Cole p. 25
- Cole p. 26
- Glyde No. 402A
- Glyde No. 403
- ^ Cole p. 75
- "HQ Southern Command Order of Battle 23/06/1941". Orders of Battle. Retrieved 30 August 2017.
- Cole p. 19
- ^ Cole p. 17
- ^ Cole p. 18
- Boulanger p. 388
- Boulanger p. 389
- ^ Cole p. 20
- Palmer, Rob. "Map of Corps districts, September 1940" (PDF). britishmilitaryhistory.co.uk. Retrieved 1 September 2017.
- Palmer, Rob. "Northern Ireland District History" (PDF). britishmilitaryhistory.co.uk. Retrieved 1 September 2017.
- ^ Cole p. 28
- Boulanger p. 365
- Boulanger p. 382
- Boulanger p. 430
- Boulanger p. 576
- ^ Cole p. 27
- ^ Cole p. 29
- ^ Cole p. 30
- ^ Cole p. 53
- Cole p. 54
- Dorosh, Michael. "2nd Canadian Corps". canadiansoldiers.com. Retrieved 30 August 2017.
- Glyde Nos 633, 635, 1212, 1214
- Cole p. 61
- Glyde No. 405
- Glyde No. 406
- Glyde No. 407
- Cole p. 76
- ^ Cole p. 99
- Cole pp. 99-105
- ^ Cole p. 100
- ^ Cole p. 104
- ^ Cole p. 103
- ^ Cole p. 102
- ^ Cole p. 101
- Boulanger p. 446
- ^ Cole p. 105
- ^ Cole p. 119
- ^ Cole p. 118
- ^ Cole p. 112
- Cole p. 113
- Cole p. 114
- Glyde Nos.1173 - 1204
- ^ Cole p. 111
- Cole p. 120
- ^ Cole p. 116
- ^ Cole p. 117
- Glyde No. 438
- Glyde No. 437
- Glyde No. 436
- Glyde No. 435
- Glyde No. 434
- Glyde No. 433
- Glyde No. 432
- Glyde No. 431
- Cole (2) p. 25
- Cole (2) p. 12
- ^ Cole (2) p. 13
- Cole (2) p. 14
- ^ Cole (2) p. 15
- Cole (2) p. 52
- Cole (2) p. 85
- Cole (2) p. 86
- Cole (2) p. 38
- ^ Cole (2) p. 39
- ^ Cole (2) p. 36
- Cole (2) p. 33
- Cole (2) p. 35
- ^ Cole (2) p. 34
- Cole (2) p. 35 addendum
- ^ Cole p. 37
- ^ Cole (2) p. 31
Bibliography
- Boulanger, Bruno (2015). WW2 British Formation Badges. Collectors Guide (1 ed.). ISBN 9782960180206.
- Cole, Howard (1973). Formation Badges of World War 2. Britain, Commonwealth and Empire. London: Arms and Armour Press.
- Cole (2), Howard, N (1953). Badges on Battledress, Post-War Formation Signs; Rank and Regimental Insignia. Aldershot: Gale and Polden.
{{cite book}}: CS1 maint: multiple names: authors list (link) CS1 maint: numeric names: authors list (link) - Davis, Brian L (1983). British Army Uniforms & Insignia of World War Two. London: Arms and Armour Press. ISBN 0853686092.
- Glynde, Keith (1999). Distinguishing Colour Patches of the Australian Military Forces 1915–1951. A Reference Guide. ISBN 0646366408.
- Jonstone, Mark (2007). The Australian Army in World War II. Oxford: Osprey Publishing. ISBN 9781846031236.
- Cigarette card series, Army, Corps and Divisional Signs 1914–1918, John Player and sons, 1920s.
- Military insignia
- British Army unit insignia
- British Army
- Field armies of the United Kingdom in World War I
- Field armies of the United Kingdom in World War II
- Military units and formations of the British Empire in World War II
- Army units and formations of Canada in World War II
- Military heraldry
- British military uniforms